
How to Measure for a Wheelchair: The Complete Fitting Guide

A well-fitted wheelchair makes all the difference in comfort, posture, and long-term health. This guide walks you through the 13 body measurements that determine your fit.

How to Use This Guide

1
Read first. Review the preparation checklist and common mistakes before picking up a tape measure.
2
Use the diagram. Scroll down to the reference diagram to see where each measurement is taken. Click any label (A–M) for a quick summary.
3
Record as you go. Click “Record Your Wheelchair Measurements” to open the input fields, then type each value as you measure.
4
Print or save. When you’re done, print your worksheet or save it as a PDF to bring to your appointment.
13
Measurements
2″
Clearance Rule
90°
Elbow Target
A–M
Label System

Measurement Session

Fill in your details and record measurements as you go.

Recorded:0/ 13

Before You Measure

Accurate measurements start with proper setup. Make sure you have all six of these ready before beginning. Tap each card to check it off as you go.

Tap a card to mark it as ready

A firm, flat surface

Sit on a table, transfer boardA smooth, rigid board used to bridge the gap between two surfaces (like a bed and a wheelchair) so a person can slide across safely., or firm chair. Soft cushions throw off your numbers.

A rigid measuring tape

Use a hard tape or yardstick. Flexible fabric tapes add false length.

A helper

Shifting posture to read the tape changes the measurement.

Target seated posture

Hips back, feet flat, all soft tissue settled naturally.

Measure straight across

All measurements straight across the body. Include all excess tissue.

Check hip ROMRange of Motion — how far a joint can move in each direction. Limited hip ROM affects how you sit and can change measurement results. & hamstrings

Limited ROMRange of Motion — how far a joint can move in each direction. and tight hamstringsThe group of muscles at the back of the thigh. When tight, they pull the pelvis backward and make it hard to sit upright. cause poor pelvic positioning.

Common Measuring Mistakes to Avoid

These are the errors that most frequently lead to a poorly fitting wheelchair. Read through each one and tap to acknowledge you’ve noted it.

Tap a card to mark it as understood

Using a flexible tape
A soft fabric tape adds false inches. Always use a rigid tape or yardstick.
Measuring on a soft surface
When the pelvis sinks into a cushion, every measurement changes.
Forgetting soft tissue
Measure where the body actually settles — not just the bony landmarks.
Measuring one side only
Left and right are almost never symmetrical. Measure both sides.
Ignoring cushion thickness
A 3-inch cushion raises seat height by 3 inches. Account for your cushion.
Rushing or skipping re-checks
Bodies change. Re-measure at least once a year.

Measurement Reference Diagram

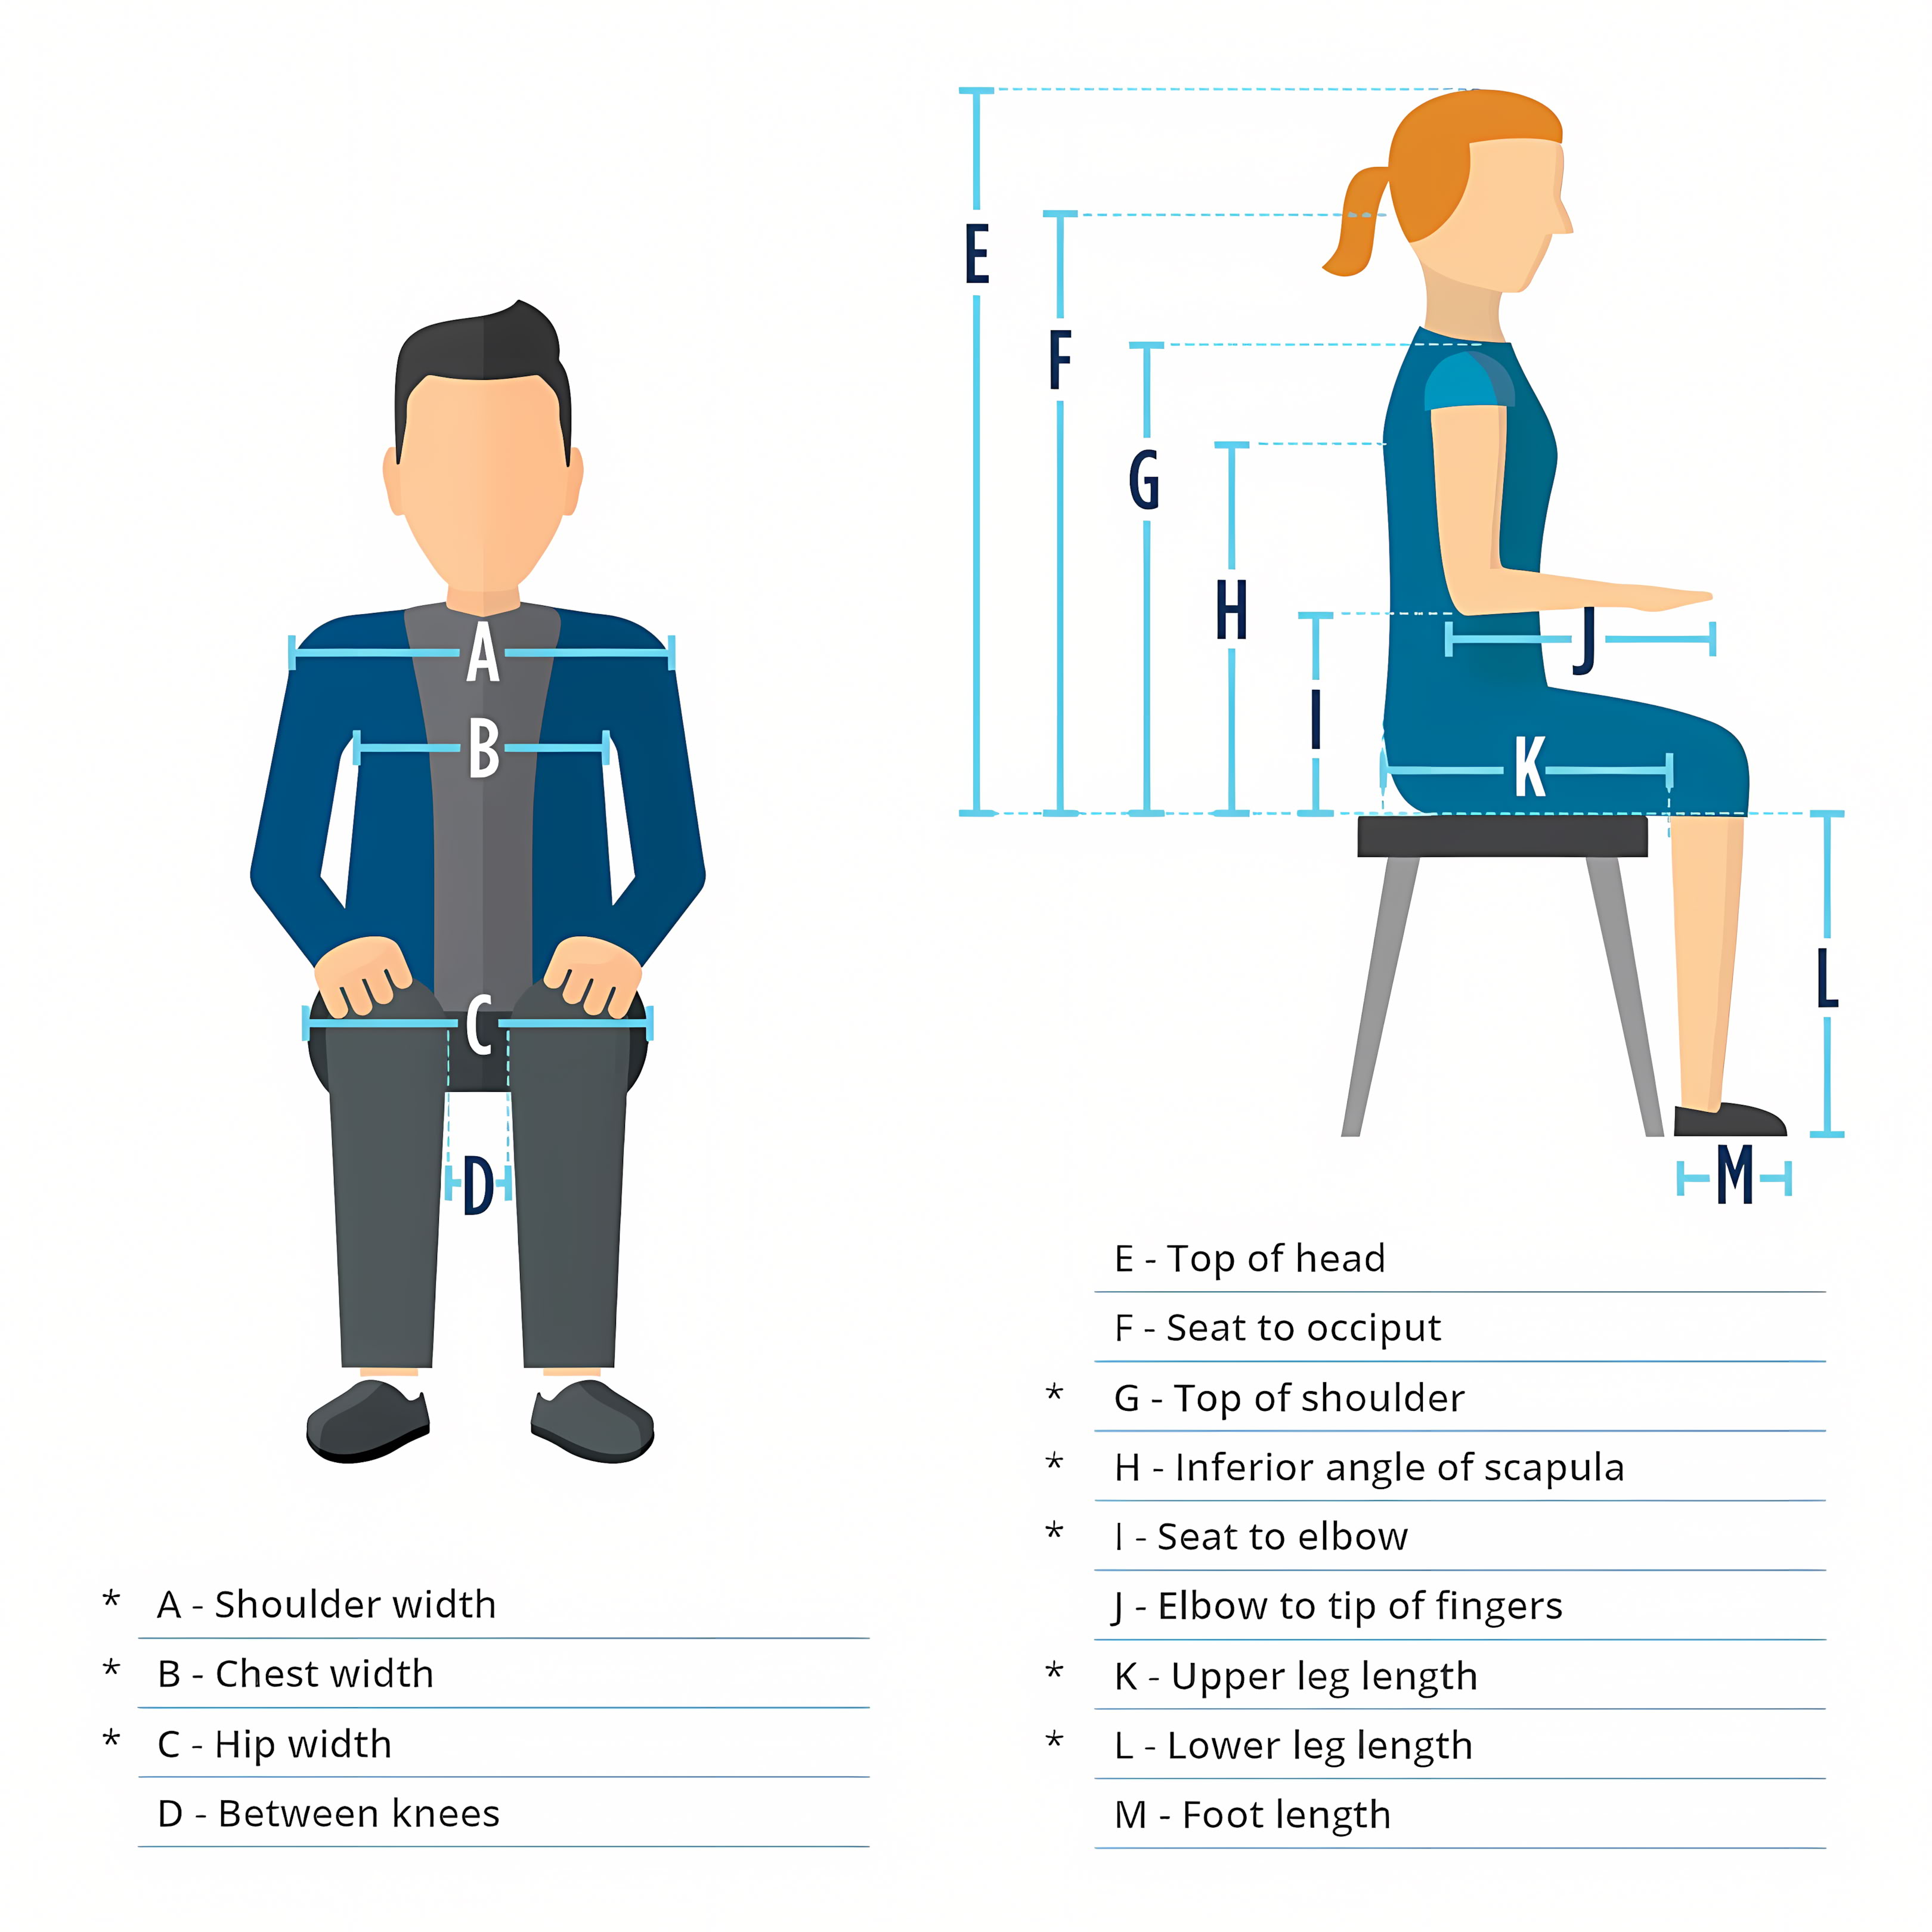
All 13 measurements (A–M) — front and side views

Wheelchair measurement diagram
Reference
Reference diagram
Click any label for a quick summary, or use the arrows to step through A–M
1

Seat Measurements

Your seat width and depth are the foundation of a good fit. If you’re shopping for a wheelchair seat cushion, getting these right is especially important.

How to measure: Find the widest point of the hips and measure straight across. Include all soft tissue — measure where the body actually rests when seated.

You want about ½ inch of clearance on each side between the hips and the side guardsThe panels on either side of the seat that prevent clothing or skin from contacting the wheels.. Too wide and the pelvis shifts. Too narrow and it presses skin against the side guards, risking pressure sores.

in
How to measure: Buttocks to popliteal fossaThe soft, slightly hollow area at the back of the knee joint. You can feel it when you bend your knee. (crease behind the knee). Subtract 2 inches.
Why subtract 2 inches? You need clearance behind the knee. If the seat edge reaches all the way to the popliteal fossa, it presses into the soft tissue and can reduce circulation, cause discomfort, and increase the risk of pressure or skin irritation. The 1–2 inch gap leaves room for movement, clothing, and slight posture changes while still supporting the thighs properly.

Too short puts extra pressure on the ischial tuberositiesThe two bony points at the bottom of the pelvis — commonly called the “sit bones.” They bear most of your seated weight.. Too long pushes you into sacral sittingA slouched posture where the pelvis slides forward so you’re sitting on your tailbone instead of your sit bones. This strains the lower back and can cause skin problems..

in
How to measure: Distance between the inner edges of the knees in a relaxed seated position.

Tells you whether a medial abductorA “pommel” built into the cushion that keeps the knees apart. (pommel) should be added to the seat cushion.

in
2

Back Support Measurements

The right wheelchair backrest depends on how much trunk support you need.

How to measure: From one humeral headThe bony point at the very top of your shoulder. to the other. Include soft tissue. Keep the tape straight across.

This sets the widest point of the backrest at shoulder height.

in
How to measure: AxillaThe armpit. to axilla (armpit to armpit). Tape level and taut.

Too wide and the trunk shifts. Too narrow and it presses the ribcage. For manual wheelchair users, match or slightly narrower than shoulder width.

in
G: Seat to top of shoulder. H: Seat to bottom of scapulaThe shoulder blade.. For self-propellers, typically ~16 inches.

Measure both sides. ScoliosisSideways curvature of the spine. or pelvic obliquityA tilt where one side of the pelvis sits higher. may produce different values. Your backrest should account for that.

in
in
3

Lower Leg & Footrest

How to measure: Bottom of foot/shoe to popliteal fossaThe soft area behind the knee.. Ensure 2 inches of footplate clearance. Factor in cushion thickness.
in
How to measure: Heel to toe, with shoes on if you typically wear them. Footplate must fully support the foot.
in
4

Arm Supports

How to measure: Elbow at 90°. Seat surface to underside of forearm. Measure both sides separately.

Too high pushes shoulders up (pain). Too low causes trunk lean. If left/right differ, get adjustable arm rests.

in
in
How to measure: Back of elbow to where you'd like the arm support to end. Standard length works for most people.
in
5

Head Support

E: Seat to crown of head. F: Seat to occipital boneThe bone at the base of the skull.. Position pad in the suboccipital areaJust below the base of the skull. The natural resting point for a headrest..

Body must be aligned first. Look for headrest hardware with lateral, front-to-back, height, and angle adjustability.

in
in

Not sure about your measurements?

Our team offers free virtual consultations to help you get the right fit.

1-619-810-0010
Mon–Thu 9–5 CST · Fri 9–3 CST
Link copied

Still need to record measurements?

The measurement recorder lets you log all 13 values as you go and print a worksheet to bring to your appointment.

Some required measurements are missing

The following 8 essential measurements (marked with *) haven’t been filled in yet: